Views: 176
Method 01
How to create a new WPBakery component
If you use WPBakery in the past and want to build your own custom component, look no more. In this blog post, we will build our own WPBakery component that allows us to use our own semantic HTML and design it the way we want it. If you wonder why we don’t install a plugin like Mega Addons For WPBakery Page Builder and customize it, it is because page speed is important. Every plugin that we install comes with extra CSS and JS files. Those can add up and really bite into your performance budget. On top of that, we want to have tight control over the design of our components.
Where do I add the code?
As I wrote in “How to remove unused components from WPBakery” we like to create a small plugin “sodawebmedia-wpbakery” where we add all of our custom WPBakery modules. If you choose not to have a small plugin and prefer to have the code in the theme folder, I recommend creating a separate file for your modules. While you could add all the code in functions.php, it can get messy and confusing very quickly. Instead, create a folder, something like vc-components and inside create a file that reflects the component you are about to custom code. In our case, we can have vc-soda-blockquote.php. Now, in function.php we can reference our file.
// Require new custom Element
    require_once( get_template_directory().'/vc-components/vc-soda-blockquote.php' );
Creating the new WPBakery component
Before we show you the code, we want to say that there are many ways to build it. This is an example of how we build a new WPBakery component if it will be placed in a plugin folder instead of the theme folder. We start by creating a new class VcSodaBlockquote, extend WPBakeryShortCode, and add the basic structure of the component
if ( ! class_exists( 'VcSodaBlockquote' ) ) {

    class VcSodaBlockquote extends WPBakeryShortCode {

        //Initialize Component
        function __construct() {
            add_action( 'init', array( $this, 'create_shortcode' ), 999 );
            add_shortcode( 'vc_soda_blockquote', array( $this, 'render_shortcode' ) );

        }

        //Map Component
        public function create_shortcode() {

            //Code in the next steps

        }

        //Render Component
        public function render_shortcode( $atts, $content, $tag ) {
            //Code in the next steps
        }

    }

    new VcSodaBlockquote();

}
Create Shortcode
To create a shortcode, we will use vc_map a function provided by WPBakery that allows us to create new fields inside our component. If you want to learn what other fields you can use, check out WPBakery Page Builder – vc_map() field examples
In our example, we will create 5 fields: a content field, 3 text fields, and a link button.
public function create_shortcode() {
    // Stop all if VC is not enabled
    if ( !defined( 'WPB_VC_VERSION' ) ) {
        return;
    }

    // Map blockquote with vc_map()
    vc_map( array(
        'name'          => __('Blockquote ', 'sodawebmedia'),
        'base'          => 'vc_soda_blockquote',
        'description'  	=> __( '', 'sodawebmedia' ),
        'category'      => __( 'SodaWebMedia Modules', 'sodawebmedia'),
        'params' => array(

            array(
                "type" => "textarea_html",
                "holder" => "div",
                "class" => "",
                "heading" => __( "Blockquote Content", 'sodawebmedia' ),
                "param_name" => "content", // Important: Only one textarea_html param per content element allowed and it should have "content" as a "param_name"
                "value" => __( "<p>I am test text block. Click edit button to change this text.</p>", 'sodawebmedia' ),
                "description" => __( "Enter content.", 'sodawebmedia' )
            ),

            array(
                'type'          => 'textfield',
                'heading'       => __( 'Author Quote', 'sodawebmedia' ),
                'param_name'    => 'quote_author',
                'value'         => __( '', 'sodawebmedia' ),
                'description'   => __( 'Add Author Quote.', 'sodawebmedia' ),
            ),


            array(
                "type" => "vc_link",
                "class" => "",
                "heading" => __( "Blockquote Cite", 'sodawebmedia' ),
                "param_name" => "blockquote_cite",
                "description" => __( "Add Citiation Link and Source Name", 'sodawebmedia' ),
            ),

            array(
                'type'          => 'textfield',
                'heading'       => __( 'Element ID', 'sodawebmedia' ),
                'param_name'    => 'element_id',
                'value'             => __( '', 'sodawebmedia' ),
                'description'   => __( 'Enter element ID (Note: make sure it is unique and valid).', 'sodawebmedia' ),
                'group'         => __( 'Extra', 'sodawebmedia'),
            ),

            array(
                'type'          => 'textfield',
                'heading'       => __( 'Extra class name', 'sodawebmedia' ),
                'param_name'    => 'extra_class',
                'value'             => __( '', 'sodawebmedia' ),
                'description'   => __( 'Style particular content element differently - add a class name and refer to it in custom CSS.', 'sodawebmedia' ),
                'group'         => __( 'Extra', 'sodawebmedia'),
            ),
        ),
    ));

}
Render Shortcode
We are finally ready to work on the front end layout. render_shortcode function will allow us to extract the values and save them in variables for later use. Before we display the content, it is important to escape our variable for security reasons. In case we have a database breach, we want to ensure that everything that will be output on the website is output in a safe mode. If can learn more about how to secure your output on WordPress Developer Resources.
public function render_shortcode( $atts, $content, $tag ) {
    $atts = (shortcode_atts(array(
        'blockquote_cite'   => '',
        'quote_author'      => '',
        'extra_class'       => '',
        'element_id'        => ''
    ), $atts));


    //Content
    $content            = wpb_js_remove_wpautop($content, true);
    $quote_author       = esc_html($atts['quote_author']);

    //Cite Link
    $blockquote_source  = vc_build_link( $atts['blockquote_cite'] );
    $blockquote_title   = esc_html($blockquote_source["title"]);
    $blockquote_url     = esc_url( $blockquote_source['url'] );

    //Class and Id
    $extra_class        = esc_attr($atts['extra_class']);
    $element_id         = esc_attr($atts['element_id']);


    $output = '';
    $output .= '<div class="blockquote ' . $extra_class . '" id="' . $element_id . '" >';
    $output .= '<blockquote cite="' . $blockquote_url . '">';
    $output .= $content;
    $output .= '<footer>' . $quote_author . ' - <cite><a href="' . $blockquote_url . '">' . $blockquote_title . '</a></cite></footer>';
    $output .= '</blockquote>';
    $output .= '</div>';

    return $output;

}
Results and Complete Code
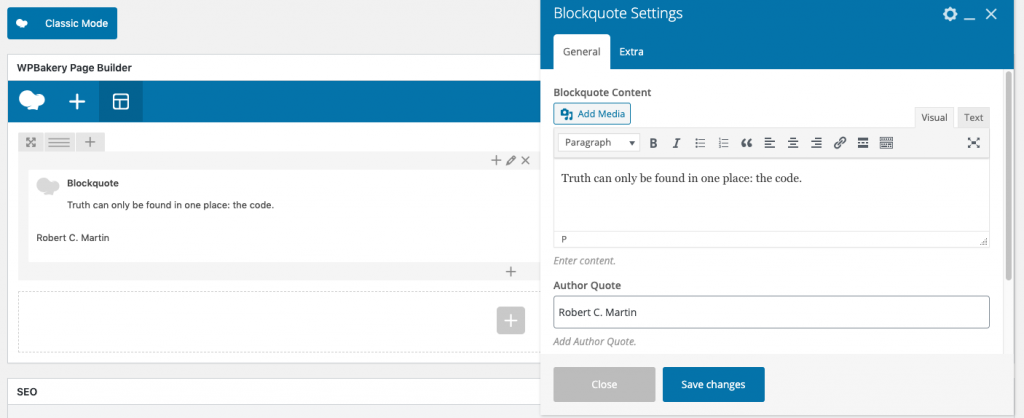
In our WordPress dashboard, we should have our new component.

For full code, you can download our small plugin from our GitHub repository. If you want to add it to your plugin, copy the full code.
class VcSodaBlockquote extends WPBakeryShortCode {

    function __construct() {
        add_action( 'init', array( $this, 'create_shortcode' ), 999 );
        add_shortcode( 'vc_soda_blockquote', array( $this, 'render_shortcode' ) );

    }

    public function create_shortcode() {
        // Stop all if VC is not enabled
        if ( !defined( 'WPB_VC_VERSION' ) ) {
            return;
        }

        // Map blockquote with vc_map()
        vc_map( array(
            'name'          => __('Blockquote', 'sodawebmedia'),
            'base'          => 'vc_soda_blockquote',
            'description'  	=> __( '', 'sodawebmedia' ),
            'category'      => __( 'SodaWebMedia Modules', 'sodawebmedia'),
            'params' => array(

                array(
                    "type" => "textarea_html",
                    "holder" => "div",
                    "class" => "",
                    "heading" => __( "Blockquote Content", 'sodawebmedia' ),
                    "param_name" => "content", // Important: Only one textarea_html param per content element allowed and it should have "content" as a "param_name"
                    "value" => __( "<p>I am test text block. Click edit button to change this text.</p>", 'sodawebmedia' ),
                    "description" => __( "Enter content.", 'sodawebmedia' )
                ),

                array(
                    'type'          => 'textfield',
                    'holder'        => 'div',
                    'heading'       => __( 'Author Quote', 'sodawebmedia' ),
                    'param_name'    => 'quote_author',
                    'value'         => __( '', 'sodawebmedia' ),
                    'description'   => __( 'Add Author Quote.', 'sodawebmedia' ),
                ),


                array(
                    "type" => "vc_link",
                    "class" => "",
                    "heading" => __( "Blockquote Cite", 'sodawebmedia' ),
                    "param_name" => "blockquote_cite",
                    "description" => __( "Add Citiation Link and Source Name", 'sodawebmedia' ),
                ),

                array(
                    'type'          => 'textfield',
                    'heading'       => __( 'Element ID', 'sodawebmedia' ),
                    'param_name'    => 'element_id',
                    'value'             => __( '', 'sodawebmedia' ),
                    'description'   => __( 'Enter element ID (Note: make sure it is unique and valid).', 'sodawebmedia' ),
                    'group'         => __( 'Extra', 'sodawebmedia'),
                ),

                array(
                    'type'          => 'textfield',
                    'heading'       => __( 'Extra class name', 'sodawebmedia' ),
                    'param_name'    => 'extra_class',
                    'value'             => __( '', 'sodawebmedia' ),
                    'description'   => __( 'Style particular content element differently - add a class name and refer to it in custom CSS.', 'sodawebmedia' ),
                    'group'         => __( 'Extra', 'sodawebmedia'),
                ),
            ),
        ));

    }

    public function render_shortcode( $atts, $content, $tag ) {
        $atts = (shortcode_atts(array(
            'blockquote_cite'   => '',
            'quote_author'      => '',
            'extra_class'       => '',
            'element_id'        => ''
        ), $atts));


        //Content
        $content            = wpb_js_remove_wpautop($content, true);
        $quote_author       = esc_html($atts['quote_author']);

        //Cite Link
        $blockquote_source  = vc_build_link( $atts['blockquote_cite'] );
        $blockquote_title   = esc_html($blockquote_source["title"]);
        $blockquote_url     = esc_url( $blockquote_source['url'] );

        //Class and Id
        $extra_class        = esc_attr($atts['extra_class']);
        $element_id         = esc_attr($atts['element_id']);


        $output = '';
        $output .= '<div class="blockquote ' . $extra_class . '" id="' . $element_id . '" >';
        $output .= '<blockquote cite="' . $blockquote_url . '">';
        $output .= $content;
        $output .= '<footer>' . $quote_author . ' - <cite><a href="' . $blockquote_url . '">' . $blockquote_title . '</a></cite></footer>';
        $output .= '</blockquote>';
        $output .= '</div>';

        return $output;

    }

}

new VcSodaBlockquote();
Source : sodawebmedia
Method 02
Create A WPBakery Visual Composer Add-On
If you’ve ever used WPBakery Visual Composer while building a website, which we are sure most of you have. You’ve probably thought at least one time that it would be nice to build your own custom Visual Composer Add-on.
Well, this tutorial will explain how to do just that. Note: This will only work if you have Visual Composer already integrated into your theme.
For this example we will be building a Directory addon to Visual Composer that will make it easy to add a list of businesses/products and their information to your website. However, you can pretty much use our example for a number of useful things. Now, let’s get started!
Don’t Want To Touch Any Code?
Have one of our WordPress Experts add the following code snippets for you. Chill out while we do the hard work.Get Help
Where to add your code
There are a few different ways you can add the code to create your own custom WPBakery Visual Composer add-on. The way we are going to approach it however is by create a custom WordPress plugin so if would like to reuses this add-on for other website builds it will be super easy.
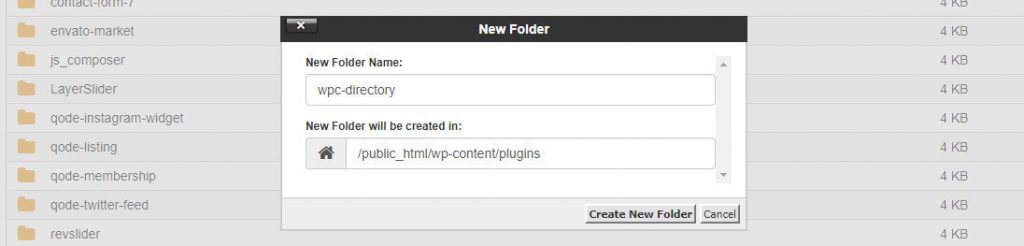
So to get started, let’s open up your websites FTP and under /wp-content/plugins/ let’s create a new folder called wpc-directory.
The next step, we are going to open the new folder wpc-directory we just created and add two new files.
- The first file we will call it wpc-directory.php and this will be our main plugin file.
- The second file we are going to create is vc-directory-element.php. This will be the framework for our custom WPBakery Visual Composer add-on.
Now that we have created those two files, let’s open wpc-directory.php and past in the following code:
<?php

/*
Plugin Name: WPC Directory
Plugin URI: https://wpcodeus.com/
Description: An extension for Visual Composer that display an community directory option
Author: WP Codeus
Version: 1.0.0
Author URI: https://wpcodeus.com/
*/


// If this file is called directly, abort

if ( ! defined( 'ABSPATH' ) ) {
     die ('Silly human what are you doing here');
}


// Before VC Init

add_action( 'vc_before_init', 'wpc_vc_before_init_actions' );

function wpc_vc_before_init_actions() {

// Require new custom Element

include( plugin_dir_path( __FILE__ ) . 'vc-directory-element.php');

}

// Link directory stylesheet

function wpc_community_directory_scripts() {
    wp_enqueue_style( 'wpc_community_directory_stylesheet',  plugin_dir_url( __FILE__ ) . 'styling/directory-styling.css' );
}
add_action( 'wp_enqueue_scripts', 'wpc_community_directory_scripts' );
Code Explanation
- Line 22 we added an action to the the vc_before_init VC hook, so are function will be called VC init
- Line 28 we include the file we just created vc-directory-element.php and to find its absolute path we used include( plugin_dir_path( __FILE__ )
After you have pasted in the code above let’s go ahead and save that, and open our next file called vc-directory-element.php. Now we can finally start building the WPBakery Visual Compose Add-on!
Initialize your new Element
Now you should have the file vc-directory-element.php open. Go ahead and paste in the code below:
<?php

/**
* Adds new shortcode "info-box-shortcode" and registers it to
* the WPBakery Visual Composer plugin
*
*/


// If this file is called directly, abort

if ( ! defined( 'ABSPATH' ) ) {
    die ('Silly human what are you doing here');
}


if ( ! class_exists( 'vcInfoBox' ) ) {

	class vcInfoBox {


		/**
		* Main constructor
		*
		*/
		public function __construct() {

			// Registers the shortcode in WordPress
			add_shortcode( 'info-box-shortcode', array( 'vcInfoBox', 'output' ) );

			// Map shortcode to Visual Composer
			if ( function_exists( 'vc_lean_map' ) ) {
				vc_lean_map( 'info-box-shortcode', array( 'vcInfoBox', 'map' ) );
			}

		}


		/**
		* Map shortcode to VC
    *
    * This is an array of all your settings which become the shortcode attributes ($atts)
		* for the output.
		*
		*/
		public static function map() {
			return array(
				'name'        => esc_html__( 'Listing', 'text-domain' ),
				'description' => esc_html__( 'Add new listing', 'text-domain' ),
				'base'        => 'vc_infobox',
				'category' => __('WPC Directory', 'text-domain'),
				'icon' => plugin_dir_path( __FILE__ ) . 'assets/img/note.png',
				'params'      => array(
					array(
						'type'       => 'attach_image',
						'holder' => 'img',
						'heading' => __( 'Image', 'text-domain' ),
                        'param_name' => 'bgimg',
						// 'value' => __( 'Default value', 'text-domain' ),
                        'admin_label' => false,
                        'weight' => 0,
                        'group' => 'Listing',
					),

					array(
                        'type' => 'textfield',
                        'holder' => 'h3',
                        'class' => 'title-class',
                        'heading' => __( 'Business Name', 'text-domain' ),
                        'param_name' => 'title',
                        'value' => __( '', 'text-domain' ),
                        'admin_label' => false,
                        'weight' => 0,
                        'group' => 'Listing',
                    ),

                    array(
                        'type' => 'textarea_html',
                        'holder' => 'div',
                        'class' => 'wpc-text-class',
                        'heading' => __( 'Description', 'text-domain' ),
                        'param_name' => 'content',
                        'value' => __( '', 'text-domain' ),
                        'description' => __( 'To add link highlight text or url and click the chain to apply hyperlink', 'text-domain' ),
                        // 'admin_label' => false,
                        // 'weight' => 0,
                        'group' => 'Listing',
                    ),

				),
			);
		}


		/**
		* Shortcode output
		*
		*/
		public static function output( $atts, $content = null ) {

			extract(
				shortcode_atts(
					array(
						'bgimg' => 'bgimg',
						'title'   => '',
					),
					$atts
				)
			);

  		$img_url = wp_get_attachment_image_src( $bgimg, "large");

        // Fill $html var with data
        $html = '
        <div class="wpc-directory-wrap">

            <img class="wpc-directory-image" src="'. $img_url[0] .'">

            <h2 class="wpc-directory-title">' . $title . '</h2>

            <div class="wpc-directory-text">'. $content .'</div>

        </div>';

        return $html;

		}

	}

}
new vcInfoBox;
Customizing Your WPBakery Visual Composer Add-on
As we mentioned above, for this example we are making a directory style WPBakery Visual Composer Add-on. Looking at the code you just pasted you will see starting at line 24 that there is a function called map. This is passing an array of options and params which will structure our new add-on.
Next if you look at line 48 you will see the WPBakery Visual Composer elements name “Listing”. This is the name of the new add-on that we are adding. You can name this whatever you would like.
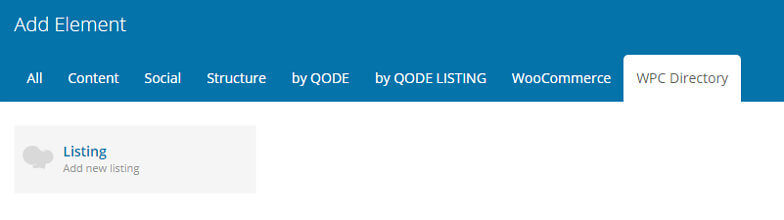
On line 51 using the category attribute it is allowing us to create a custom tab for your add-on in the VC list of elements. For this example we named our category WPC Directory, but you can change it to your liking as well. If you don’t add the category attribute, your element will be placed in the “All” tab.
VC Field Options
On lines 54 to line 88 you can see that there are 3 different arrays.
The array on line 54 is an array type attach_image. This array will allow us to add an image option to your new element.
The second array on line 65 is an array type textfield. This is what we will be using to add our Business Name option.
And the last array on line 77 is an array type textarea_html. This allows us to have a text area for our listing directory.
You can see on each array that we have the attributes heading. You can change this to have a custom heading for each option. On the third array you will also see the attribute description. Since we didn’t want descriptions on the first two options we did not include it on those. However, you can copy and paste the attribute to the first two options if you would like a description.
If you would like to add a new field type that isn’t in our example, here is a link that has a list of all the Visual Composer vc_map field examples.
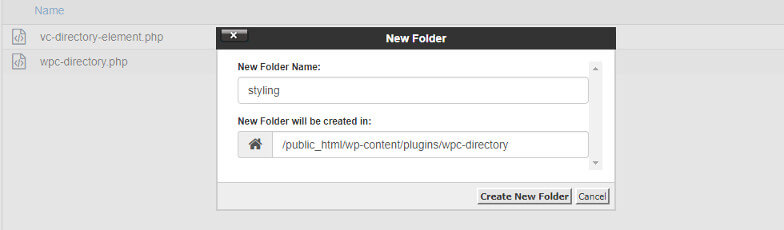
Styling Our New Add-on
The last step to creating our custom WPBakery Visual Composer add-on is to do some styling! First let’s go back to our FTP and under our plugin folder wpc-directory let’s create a new folder and call it styling. Next, open the new folder you just created and let’s create a file called directory-styling.css.
Now that we have all the proper folders and files created, let’s go ahead and paste in our CSS that we have created for you:
/* Directory Styling */
.wpc-directory-wrap {
border: 1px solid #dbdbdb;
margin-bottom: 31px;
padding-bottom: 28px;
}
.wpc-directory-image {
object-fit: cover;
width: 100%;
height: 230px;
margin-bottom: 10px;
}
.wpc-directory-title {
color: #1e2427;
font-family: 'Source Pro Sans', sans-serif;
font-size: 22.5px;
line-height: 27px;
font-style: normal;
font-weight: 600;
letter-spacing: 0px;
text-transform: none;
margin-bottom: 6px;
padding: 8px 30px 5px 30px;
}
.wpc-directory-text {
font-size: 14px;
line-height: 23px;
padding: 0px 30px 0px 30px;
}
.wpc-directory-text a {
color: #cd4335;
font-weight: 600;
}
.wpc-directory-wrap img[src=""] {
display: none;
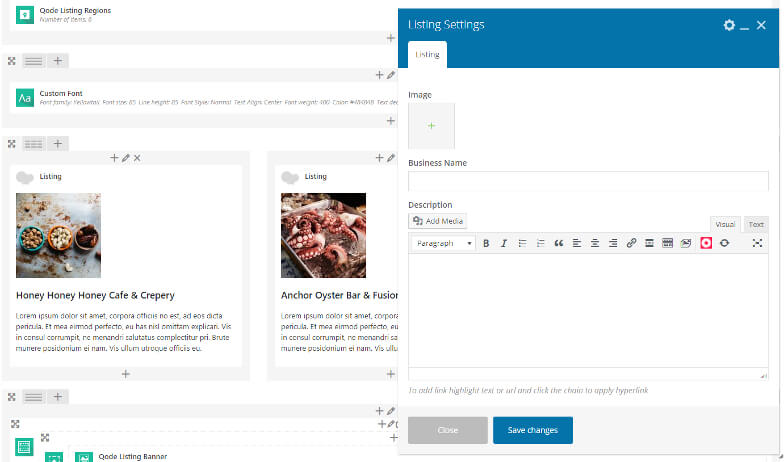
}And that is it! Once you have saved all your files and activated your new plugin in the WordPress dashboard, you will have created your first WPBakery Visual Composer Add-on. If you did everything correctly you will have a new directory style visual composer element that will look like this:
Source : wpcodeus